AGB IPS V2 FunnyPlaying / Hispeedido | Install Guide
This is our install guide for the HISPEEDIDO V2 GBA IPS kit and the Funnyplaying V2 GBA IPS kit.
- Soldering Iron (Optional for brightness control)
- Tweezers
- J1 (Japanese industrial standard) Screwdriver
- Y1 Tri-point screwdriver
- Kapton tape
- Double sided gift tape (Uses a more gentle adhesive which is easier to remove later)
Ensure you have all parts included with each kit. See below.
HISPEEDIDO V2 IPS Kit Includes:
- IPS panel
- Flex cable
- Connection wires
- Foam insulation
- Insulation sticker
- Display spacer brackets
Funnyplaying V2 IPS Kit Includes:
- IPS panel
- Flex cable
- Connection wires
- Foam insulation
Installing your IPS kit, bending the ribbon cables, soldering, or applying any adhesives in this kit will void the warranty and return policy. Fully test your kit before proceeding.
Brightness control is optional. If you are uncomfortable with soldering, you can skip this entire step. Your IPS will be stuck on one brightness level.
Add flux, then add solder to the connection points on the included ribbon cable. Connect the included wires to each of the connection points as shown. The GND connection is not required.

Add flux, then add solder to the pad labelled TP2 on the front of the main board. This will connect to the pad labelled 'SEL' on the ribbon cable later on.

Lay the IPS display and the included flex cable flat on your workspace. Connect the IPS display to the flex cable. Take extra caution when connecting this part; the connector is very fragile!

This kit requires bending the ribbon cable to fully install this kit on 32-pin model GBA consoles. Once again, please ensure you have fully tested your kit before proceeding!
For 32-pin GBA consoles, bend the included flex cable as shown.

Flip the entire assembly over. Optionally add a small strip of double sided tape to hold the ribbon cable against the back of the IPS display.

For 32 pin models, tuck the 40 pin connector as shown:

Add a strip of kapton tape over the unused connector.

Adhere the insulating film to the rear of the LCD, ensuring it covers the flex PCB. If you are using the FunnyPlaying kit, use several strips of kapton tape to insulate the ribbon cable completely.

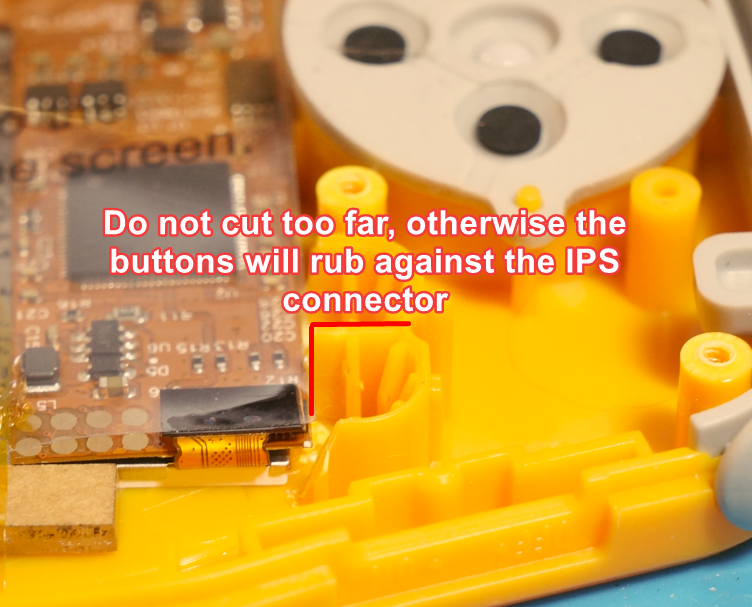
Even with pre-cut shells, we recommend carefully examining the Start/Select area and trimming as needed. The Flex PCB extends out past the IPS display by a milimeter or less, it can slightly vary.
See the diagram below for an estimate of how much you'll need to trim.


Optionally apply the adhesive for the display. This may make future adjustments difficult or impossible to do without damaging the IPS display. For this reason, we recommend other methods such as kapton tape to hold the display in place.
Apply the screen adhesive to the inside of the shell as shown.

Remove the inner adhesive cover as well as the protective film from the IPS display. Install the alignment spacers along with the IPS display assembly. The IPS should sit flush against the right side of the housing, with the thinner alignment bracket sitting on the left hand side.

If you are using a shell you've trimmed yourself, you may use this additional alignment bracket at the bottom of the screen.

Solder the Select wire to the TP2 pad from earlier.

Place the insulation foam on top of the IPS display. Insert all face buttons, the LED indicator lens, and the button membranes.
Insert the display ribbon cable into the connector as shown. This step is easier when the main board is not screwed down and will help preserve the cable from being bent too sharply.

Replace the three J0 screws to hold the main board to the front shell.

Solder the connections for the L and R button wires as shown.


Finalize the placement of wire as shown to prevent the wires from being pinched during reassembly.

Install the power switch, shoulder buttons, and rear shell. Do not screw anything together at this point. Install batteries and power the device on. At this point, you should see the display light up. If the display is not working as expected, carefully inspect all connection points and try again.
If you performed the optional soldering steps, you can control the brightness of the IPS kit by holding Select and pressing L or R to increase or decrease the brightness level.

If everything is functioning as expected, go ahead and complete the reassembly by replacing the rear screws. See our disassembly guide if you need further assistance here.
- If you have any questions or concerns, please reach out to [email protected]

